728x90
300x250

[Welding] 용접자세와 이음의 종류(Type of welding posture and joint)


용접사와 설계자 등이 소통하기 위해서 사용되는 것이라고 본다.

먼저 자세와 이음에 대해서 간략하게 소개한다.


몇 가지 표기를 알면 도움이 될 것으로 보인다.


1. 자세(Position)

(1) 아래보기 자세 (Flat position, F)

 번호

 언어(Language)

기술(Description)

1

한글(Korean)

 접합하려는 재료를 수평으로 놓고 용접봉을 아래로 향하여 용접하는 자세

2

영어(English)

    Place the material to be welded horizontally and weld the welding rod downward 


(2) 위 보기 자세(Over Head position, OH)

번호

언어(Language)

기술(Description)

1

한글(Korean)

 - 아래에서 위를 올려다 보며 용접하는 자세
 - 용접선이 수평과 45゚이하의 각도를 이루는 경우
 - 작업물의 밑에서 작업을 하게 되기 때문에 아크가 끊기거나 모재에 달라붙는 등 실수가 발생하는 까다로운 작업임.

2

영어(English)

 - Looking up from below to welding position
 - If the weld line is horizontal and less than 45 °
 - Because you are working under the workpiece,
   It is difficult to make mistakes such as sticking to the base material.


(3) 수평자세(Horizontal position, H)

번호 

 언어(Language)

기술(Description) 

 1

 한글(Korean)

 - 용접선이 거의 수평인 이음에 대해 옆에서 행하는 용접 자세(15°이하 경사, =횡향자세)

 2

 영어(English)

 - Welding posture (15 ° inclination or less = horizontal position)


(4) 수직 자세(Vertical position, V) 


 번호

 언어(Language)

 기술(Description)

 1

 한글(Korean)

 - 용접 작업대의 수평면에 대하여 수직을 이루는 면 또는 60゚도 이상의 각도를 가진 면을 작업하는 자세
 - 직립자세라고도 하며 밑에서 위로 나아가며 행하는 용접법

 2

 영어(English)

 - a working plane perpendicular to the horizontal plane of the welding workbench or an angle of 60 degrees or more 
 - Also referred to as an upright posture,
 - Welding posture (15 ° inclination or less = horizontal position)


(5) 전자세(All Position, AP) 
A combination of two or more of the above postures
- 위 자세의 2가지 이상을 조합하여 응용하는 자세


2. 이음(Joint)


 언어

(Language)

기술(Description) 

 한글(Korean)


 영어(English)


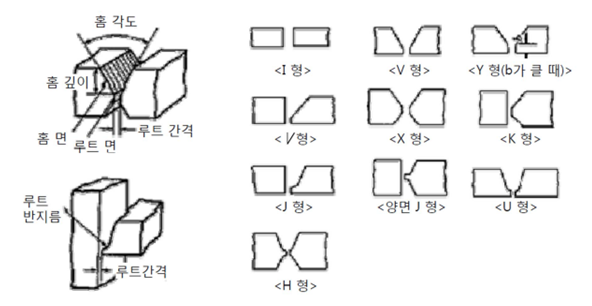
3. Type of Joints(이음의 종류)


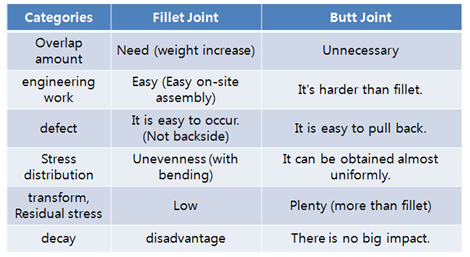
(1) 맞대기 접합(butt joint)


 번호

 언어
(Language)

 기술(Description)

 1

 한글(Korean)

 - 접합할 두 합할 부재를 맞대어 놓고 그 사이에 홈(groove)을 만들어 용접을 하므로 홈 용접이라고도 하며 
    다음과 같이 여러 종류의 홈 모양이 있고, 판 두께, 접합 방법 등에 따라 적합한 형을 선택함.

 2

 영어(English)

 - We weld two members to be joined together by making a groove between them. It is also called groove welding,
    and there are several kinds of groove shape as follows, and the type that is suitable for plate thickness,
    joining method, etc. is selected.


 언어

 (Language)

기술(Description) 

 한글(Korean)


영어(English)


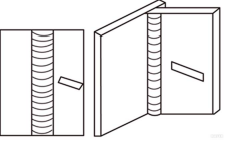
(2) 겹치기 접합(lap joint)

 번호(Number)

 또는

 Index

 언어(Language)

기술(Description) 

 1

한글(Korean)

- 두 부재를 서로 겹쳐서 하는 접합

 2

영어(English)

 splicing of two members lap joint


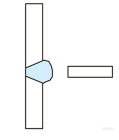
(3) 필렛 접합(fillet joint)

 번호 

 언어(Language)

 기술(Description)

1

한글(Korean)

- 한판의 단면을 다른 판 면에 올려놓고 T형으로 대략 직각이 되도록 모서리 부분을 접합하는 용접으로
   변형량은 맞대기 용접에 비해 작고, 용접 시공이 비교적 용이함

2

영어(English)

 - Place one side of the plate on the other side of the plate, The edges are joined so that they are
   approximately at right angles.

 - The amount of deformation by welding is smaller than that of butt welding, Construction is relatively easy


(4) 모서리 접합(corner joint)

 번호

 언어(Language)

 기술(Description)

 1

 한글(Korean)

 - 두 부재를 대략 직각인 L형으로 유지하고 그 모서리에 용접을 함.

 2

 영어(English)

 - Maintain both members at approximately right angled L-shape, Weld to the edge.


(5) 가장자리 접합(edge joint)

 번호

 언어(Language)

 기술(Description)

 1

 한글(Korean)

 - 두 개 이상 평행하게 겹친 부재의 단면의 이음

 2

 영어(English)

 - Joints of two or more parallel members overlapping each other


(6) 플러그 접합(plug joint)
- It is used instead of rivet by drilling a hole in one member for welding of upper and lower members and welding it in this hole.
- 주로 상,하부재의 접합을 위하여 한쪽 부재에 구멍을 뚫고 이 구멍속을 용접하는 방법으로 리벳 대신 사용.


4. Application of weld joint(용접 이음 등의 적용 방법)


용접 이음 등을 실제로 적용하는 방법입니다.

 (1. Korean)


 (2. English)


3. 홈 용접이음(Groove Weld Joint)
- 홈에 용착금속을 메운 용접으로서 이 용접에 의하여 접합된 이음은 홈 가공한 일부 단재와 타부말재와의 표면 또는 양부재 표면끼리 적당히 배치하여

  구성된다.
- 용접하기 쉽고 경제적인 홈이 될 수 있도록 용접부재의 단부 또는 표면을 가공한 뒤 용접한다.
- Welding of weld metal in grooves.
   The welded joints are formed by appropriately arranging the surface of the grooved part and the surface of the part or both of the parts.

- After machining the end or surface of the welding member to make it easy to weld and economical groove, weld it.

 4. 용접 이음의 선택 조건 (Korean) / 4. Selection condition of welding joint (English)

 번호

 언어(Language)

 기술(Description)

 1

 한글(Korean)

 1. 각종 이음의 특성
 2. 하중의 종류, 크기
 3. 용접방법, 판 두께, 구조물의 종류, 형상, 재질
 4. 변형도 및 용접의 난이도
 5. 이음의 준비 및 설계 용접에 필요한 비용

 2

 영어(English)

 1. Characteristics of various joints
 2. Type of load, size
 3. Welding method, plate thickness,

     type of  structure, shape, material
 4. Deformation and Difficulty of Welding
 5. Preparation and design of joints


 5. 필릿용접 이음(Korean) 5. Fillet welding joint(English)

 1

한글(Korean)

 - 겹치기이음, T이음, 모서리이음, 등에서 거의 직교하는 2개의 면을 결합하는 3각형상인 단면의 용접부를 갖는
   용접. 이 용접에 접합에 의하여 생긴 이음을 필릿용접 이음이라 한다.

 2

영어(English)

 - a triangle merchant that combines two orthogonal surfaces in a lap joint, a T joint, a corner joint, etc.
   Welding with section welds. The joint produced by this welding is called fillet welded joint.


6.  특성 분석을 통한 적합한 타입 선택하기
     (
Choosing the right type through characterization)


 한글(Korean)


 (English)


5. Additional 1. 리벳과 볼트 이음 


용접의 이음에는 리벳으로 하는 방법이 있고, 볼트로 하는 방법이 있다.

둥근 머리 나사를 시중에서 쉽게 찾아볼 수 있다.


그림 5-1. 둥근머리 형태의 리벳(a Round Rivet) - 도도(Dodo)


볼트로 이음을 할 수 있다.


그림 5-2. 볼트 형태의 이음(a bolt-shaped joint)


[첨부(Attachment)]

bolt_rivet.zip

round_rivet.zip


반응형
728x90
300x250
[Welding] 용접에 대해서 소개하다.


용접(Welding)의 유래를 소개한다.


1. Welding - Concept (용접 - 개념)


[1. History]


1. 1880년

     - 아크 용접과 저항 용접이 발명되었고, 수년 후 산업계에 실용화 됨.

     - 산소 아세틸렌 용접도 그 무렵에 발명되었고, 1900년 초 실용화 됨

     - Arc welding and resistance welding were invented and put into practical use in industry several years later.

     - Oxygen acetylene welding was also invented around that time, and it was put into practical use in early 1900.


2. (1930년) / Late 1930

    - 헬륨 가스를 이용한 티그(TIG, Tungsten inert GAS Welding)용접법이 고안되어 항공기 제작분야에서 활용됨.

     - It is devised to use TIG (Tungsten inert GAS Welding) method using helium gas and is used in the field of aircraft manufacturing.


3. (1948년~) / 1948

     - 미그(MIG, Metal inert gas Welding)용접법이 발표됨.

     - MIG (Metal Inert Gas Welding) welding method is announced.


-> 기타(Wikipedia / Welding - History)

     - 금속 합류의 역사는 수천년 전으로 거슬러 올라갑니다. 가장 초기의 사례는 유럽과 중동의 청동기 시대와 철기 시대에서 비롯된 것입니다.
      
고대 그리스 역사 학자 인 헤로도투스 (Herodotus)는 치 오스 (Chios)의 글록 코스 (Glaucus of Chios)는 "혼자서 철제를 발명 한 사람"이라고 
       기원전 5 세기의 역사에서 말하고 있다.


용접은 인도 델리에 세워진 델리 (Delhi)의 철 기둥 건설에 사용되어 약 310 년 동안 광고되었고 무게는 5.4 미터 톤이었다.
비철 재료의 빠른 용접은
       가능하지만 값 비싼 차폐 가스가 필요합니다.


       차폐 금속 아크 용접은 플럭스 코팅 된 소모성 전극을 사용하여 1950년대에 개발되었으며 곧 가장 인기있는 금속 아크 용접 공정이되었습니다.

    - The history of joining metals goes back several millennia. The earliest examples of this come from the Bronze and Iron Ages
       in Europe and the Middle East.
    - The ancient Greek historian Herodotus states in The Histories of the 5th century BC that Glaucus of Chios 
       "was the man who single-handedly invented iron welding".

       Welding was used in the construction of the Iron pillar of Delhi, erected in Delhi, India about 310 AD and weighing 5.4 metric tons.


      <중략> - <Precedence>


      최근 용접과 관련된 다른 발전으로는 집중 용접 된 열원을 통해 깊고 좁은 용접을 가능하게하는 1958 년 전자빔 용접의 혁신이 있습니다.

     
1960 년 레이저의 발명에 이어 레이저 빔 용접은 수십 년 후 데뷔했으며 특히 고속 자동 용접에 유용합니다. 
      
마그네틱 펄스 용접 (MPW)은 1967 년부터 산업적으로 사용되었습니다. 마찰 교반 용접은 1991 년 Welne Institute (TWI, 영국)의 Wayne Thomas가 발명했으며
      전 세계에서 고품질의 응용 사례를 발견했습니다.

     
이 4 가지 새로운 공정은 모두 필요한 장비의 고비용으로 인해 계속 비싸고 응용 프로그램이 제한적입니다.


   - Other recent developments in welding include the 1958 breakthrough of electron beam welding, making deep and narrow welding possible
      through the concentrated heat source. Following the invention of the laser in 1960, laser beam welding debuted several decades later,
      and has proved to be especially useful in high-speed, automated welding. Magnetic pulse welding (MPW) is industrially used since 1967. 
      Friction stir welding was invented in 1991 by Wayne Thomas at The Welding Institute (TWI, UK) and found high-quality applications all over the world.
      
   - All of these four new processes continue to be quite expensive due the high cost of the necessary equipment, and this has limited their applications.


2. 용접법 개발) / <Introduction> (2. Development of welding method)


용접의 개발 단계이다. 가볍게만 읽어보세요.


3. 용접 개념


- 용접(Welding): 기타 접합하는 데 있어서 생기는 방해작용을 줄이고 접근시켜 두 금속을 접합시키는 과정을 넓은 의미의 용접(Welding)이라 함.
   (English) - Welding: Welding refers to the process of joining two metals by reducing and interfering with other interferences.


- 융접(fusion) : 모재(Base Metal)를 가열이나 상온상태에서 일부 또는 전체를 가압
또는 가열하여 융합(fusion)하는 것이다.
   (English) - Fusion: When base metal is heated or pressurized at room temperature, Or heat it to fuse.


(Korean)


(English)


4. 용접 필수 구성요소 / Welding Prerequisites


1. 용접대상이 되는 재료(
Material to be welded)

    - 모재(Base metal)

2. 열원(
Heat source)

    - 가열열원으로 가스열이나 전기에너지가 주로 사용되고 화학반응열, 기계에너지, 전자파에너지 사용

    - Gas heat or electric energy is mainly used as heat source of heat, and it uses chemical reaction heat, mechanical energy, electromagnetic energy

3. 용가재(溶加材) (
Filler metal)
    - 융합에 필요한 용접봉, 용접와이어나 납 등
    -
Welding rod, welding wire, lead etc. required for fusion

4. 용접기와 용접기구(
Welding machines and welding equipment)
    - 용접용 케이블, 홀더, 토치, 기타 공구 등
    -
Welding cables, holders, torches, other tools, etc.


5. 용접 분류


(1) 융접(fusion welding): 접합하려는 두 금속재료 즉 모재(base metal)의 접합부를 가열하여 용융 또는 반용융상태로 하여 모재만으로 또는
                                    모재와 용가재(filler metal)를 융합하여 접합하는 방법으로 융점이 같거나 비슷한 금속재료의 접합에 주로 이용

     - (English) Fusion welding : Fusion welding is a method of bonding two metal materials to be bonded, that is, a base metal,
                                              by melting them into a molten or semi-molten state and joining them by using only the base material or by fusion
                                              of the base material and filler metal. Mainly used for bonding of similar metal materials


(2)
압접 또는 고상용접(Pressure Welding): 이음부를 융점 이하로 가열하고 기계적인 압력을 가하여 큰 소성변성을 주어 접합하는 방법으로 동종 및 이종 금속간의
                                                            접합에 주로 이용되며, 냉간압접, 폭발용접 등이 있음.

     - (English) Pressure Welding: It is a method to bond joints by heating the joints below the melting point and applying mechanical pressure to the joints
                                                by means of large plastic deformation, which is mainly used for bonding between homogeneous and heterogeneous metals,
                                                and there is cold welding and explosion welding.


(3) 납땜(Brazing and Soldering): 모재를 용융하지 않고 모재보다도 용융점이 낮은 금속(납의 일종)을 삽입하여 접합하는 방법으로 접합면 사이에 표면장력의
                                               흡인력이 작용되어 접합됨.
  
- (English) Brazing and Soldering: A method of joining and joining metal (a type of lead) with a melting point lower than that of the base material without
                                                     melting the base material, so that the attraction force of surface tension is applied between the joint surfaces.


- 연납(soft solder): 땜납의 용융점이 450도 이하일 때
- 경납(hard solder): 땜납의 용융점이 450도 이상일 때

- (English) Soft solder: when the melting point of the solder is less than 450 degrees
- (English) Hard solder: When the melting point of the solder is more than 450 degrees


6. 용접 배우기 - Learning welding


1. 용접쉽게배우기-한달안에 용접사 되기1, https://youtu.be/IwmI7WfKzRU, Youtube, Accessed by 2018-07-16

2. 용접쉽게배우기-위빙2 , https://youtu.be/KMPoyRvohs4, Accessed by 2018-07-16


7. 참고자료(References)


1. Welding, https://en.wikipedia.org/wiki/Welding#History

반응형
728x90
300x250

[CAD/CAM] 프리웨어 Or 오픈소스로 사용할 수 있는 기계공학 소프트웨어


이건 하나 번역을 했습니다.

작은 것 같지만 굉장히 유용할 것으로 보입니다.


1. CAD/CAM System


 번호

소프트웨어명

설명 

 링크

1

FreeMill

공구 경로 시뮬레이션 및 G 코드 생성 기능이 있는
완전 기능의 3 축 밀링 CAM 소프트웨어.

CAD 모델러가 없으므로 다른 소프트웨어에서
해당 데이터를 만들어야합니다.
이 제품은 VisualMILL, STL, Rhino .3dm, VRML 및
원시 삼각형 파일과 같은 상용 파일 형식을 엽니다.

MecSoft Corp.에서 제작

운영체제 : Windows
 

1. 데모(Demo)

http://mecsoft.com/freemill/


2. 최근 확인

2018-07-16

3. MecSoft의 제품군

- VisualCAD/CAM
- RhinoCAM
- VisualCAM for SOLIDWORKS
- VisualCAMc
- AlibreCAM 
- FreeMILL


Fig1-1) MecSoft의 갤러리 (2축 ~ 2.5축 가공의 예)


Fig 1-2) MecSoft의 가공 작품의 예


2

PyCAM

무료 3 축 CAM 소프트웨어. CAD 모델러가 없기 때문에
3D 모델은 STL에 있어야하며 DXF 또는 SVG에서는
2D 모델이어야합니다.


  오픈 소스에 의해 생성됨
  운영 체제 : Windows, Mac, Linux

 1. http://pycam.sourceforge.net/


 2. License : GPL/GNU


Fig 1-3) LinuxCNC에 적용된 PyCAM


Fig 1-4) PyCAM Supported STL, DXF, SVG


3

HeeksCNC

무료 CNC 밀 CAD / CAM. HeeksCAD에 대한
CAM 추가 기능으로 둘 다 진행중입니다.


제작: 댄 Heeks
  운영 체제 : Windows, Linux

오픈소스
( https://code.google.com/archive/p/heekscnc/ )

제작자: 댄 Heeks가 공개하고 있는 사이트


Fig 1-5) HeeksCNC - Python으로 개발된 소스코드


Fig 1-6) HeeksCNC 프로그램(Linux / Windows) 버전 배포


Fig 1-7) HeeksCAD 열기 파일


Fig 1-8) NC 파일 불러오기 기능


4

CncSimple

밀링 및 터닝을위한 G 코드 생성 및 편집을위한 오픈 소스 CAD / CAM.
문서가 없다면, 그것을 배우기 위해 실험을해야 할 것입니다.
제작: Tenac
  운영 체제 : Windows

 http://www.e-cam.it/


현재는 e-CAM으로 업그레이드

(2018-07-16)

유료

5

FeatureMill

21/2, 3 축 밀링 및 터닝을위한 CAD/CAM 소프트웨어를
사용하기가 매우 쉽습니다.

G 코드의 "저장"및 후 처리가 절름발이되었습니다.

  EGS Inc. 작성
  운영 체제 : Windows

현재는 Autodesk에서 취급함.


https://www.autodesk.com/products/featurecam/overview 


반응형
728x90
300x250

[CAD(2D)] 몇 가지 명령어 실습(Trim, Circle, Fillet) - AutoCAD


CAD를 사용하는 데 있어서 몇 가지 명령어를 실습하고자 합니다.

나는 AutoCAD만 꼭 국한돼서 다루진 않을 것입니다.


시야가 좁아지기 때문입니다.

크게 어려운 명령어는 아닙니다.


소프트웨어
- CAD-SW: AutoCAD 2016
- OS: Microsoft Windows 7


1. Trim (자르기)


[AutoCAD 실습 - 영상]


 trim

 -> 엔터

 -> 엔터

 -> 클릭 


실습 도면: trimExample.dwg


 2. Circle (원)


 명령어: c

 찍을 좌표 (중심점) 선택

 반지름 값 입력 (예: 30도, 45도, 60도, 90도) 


3. Fillet (필렛)


필렛 사용하는 방법에 대해서 소개합니다.


 명령어: fillet

 반지름(R)                 // 실제 옵션: 명령 취소(U) 폴리선(P) 반지름(R) 자르기(T) 다중(M)

 1                              // 반지름 값 입력

 모깎는 위치 클릭 (2번)


실습 도면: fillet_example.dwg


4. DightSight나 Cadian(캐디안) (Fillet만 작성)


충분히 AutoCAD(오토캐드)와 동일하게 사용할 수 있습니다.

2D 작업만 할 거라면, 크게 많은 명령어를 사용하지 않을 것입니다.


DightSight의 단점은 1년~2년에 한 번씩은 이메일 인증을 해주는 조건으로 무료로 사용할 수 있습니다.

Cadian은 가정에서 무료로 사용할 수 있습니다.

반응형
728x90
300x250

[Mechanics] 재료역학 - E, G, v의 관계식 / 모형화


재료역학(재료과학이라고도 불림.)에서 얇지만 충실하게 다루는 탄성계수 사이의 관계(E, G, v) 관계식에 대해서 프로그래밍 코드로 모형화를 하였습니다.

탄성 계수(modulus of elasticity)는 고체 역학에서 재료의 강성도(stiffness)를 나타내는 값이다.


E = 인장 탄성 계수(또는 선형탄성계수), 영 계수 (E) [Young's modulus (E)]

G = 전단탄성계수(또는 층밀리기 탄성계수) 또는 [전단 계수 또는 강성 계수 (G)] The shear modulus or modulus of rigidity (G)

v = 푸아송의 비

K = 벌크 모듈러스(bulk modulus (K))


1. 설계[Design]


  /*
 * Author: Dodo(rabbit.white at daum dot net)
 * Created by: 2018-07-15
 * Project Name: E,G,v의 관계식(탄성계수)
 * FileName: Calculate.h
 * Description:
 */

#ifndef CALCULATE_H_
#define CALCULATE_H_


class Calculate{


 private:
           int G_TYPE_EV = 1;
           int G_TYPE_KE = 2;
           int G_TYPE_KV = 3;

           int K_TYPE_GE = 1;
           int K_TYPE_EV = 2;
           int K_TYPE_GV = 3;

           int V_TYPE_EG = 1;
           int V_TYPE_KE = 2;
           int V_TYPE_KG = 3;


 public:

           Calculate();
           ~Calculate();

           int getG_TYPE_EV(){ return this->G_TYPE_EV; }
           int getG_TYPE_KE(){ return this->G_TYPE_KE; }
           int getG_TYPE_KV(){ return this->G_TYPE_KV; }


           // G에 관한 변형식
           double getG(double v1, double v2, const int type);

           // K에 관한 변형식
           double getK(double v1, double v2, const int type);

           // v에 관한 변형식
           double getV(double v1, double v2, const int type);


 protected:


};

#endif /* CALCULATE_H_ */

 Calculate.h


 /*
 * Author: Dodo(rabbit.white at daum dot net)
 * Created by: 2018-07-15
 * Project Name: E,G,v의 관계식(탄성계수)
 * FileName: Calculate.cpp
 * Description:
 */


 #include <iostream>
 #include "Calculate.h"


 using namespace std;


 Calculate::Calculate(){}

 Calculate::~Calculate(){}


 // G에 관한 변형식
 double Calculate::getG(double v1, double v2, int type){
       double f = 0;
       double e, v, k;
       e = v = k = 0;


       switch ( type ){
              case 1:

                   e = v1;
                   v = v2;

                   f = e / ( 2 * ( 1 + v ) );
                   break;


              case 2:

                   k = v1;
                   e = v2;

                   f = ( 3 * k * e ) / ( (9 * k) - e );
                   break;


              case 3:

                   k = v1;
                   v = v2;

                   f = ( ( 3 * k ) * ( 1 - ( 2 * v ) ) ) / ( 2 * (1+v));
                   break;

     }


     return f;
 }


 // K에 관한 변형식
 double Calculate::getK(double v1, double v2, int type){

        double f = 0;
        double g, e, v;
        g = e = v = 0;


        switch ( type ){
              case 1:

                   g = v1;
                   e = v2;

                   f = (g * e) / ( ( 9 * g) - (3 * e) );
                   break;


              case 2:

                   e = v1;
                   v = v2;

                   f = e / ( 3 * ( 1 - v ) );
                  break;


              case 3:

                  g = v1;
                  v = v2;

                  f = ( ( 2* g) * ( 1 + v) ) / ( 3 * ( 1 - ( 2*v ) ) );
                  break;

        }


        return f;
 }


 // K에 관한 변형식
 double Calculate::getK(double v1, double v2, int type){

         double f = 0;
         double g, e, v;
         g = e = v = 0;


         switch ( type ){
               case 1:

                   g = v1;
                   e = v2;

                   f = (g * e) / ( ( 9 * g) - (3 * e) );
                   break;


              case 2:

                   e = v1;
                   v = v2;

                   f = e / ( 3 * ( 1 - v ) );
                   break;


              case 3:

                   g = v1;
                   v = v2;

                   f = ( ( 2* g) * ( 1 + v) ) / ( 3 * ( 1 - ( 2*v ) ) );
                   break;

       }

       return f;
 }


 // v에 관한 변형식
 double Calculate::getV(double v1, double v2, const int type){

       double f = 0;
       double e, g, k;
       e = g = k = 0;


       switch ( type ){
             case 1:

                  e = v1;
                  g = v2;

                  f = ( e - (2*g)) / (2 * g);
                  break;


            case 2:

                  k = v1;
                  e = v2;

                  f = ( ( 3 * k) - e ) / ( 6 * k );
                  break;


            case 3:

                  k = v1;
                  g = v2;

                  f = ( (3*k) - (2* g) ) / ( ( 6* k) + ( 2 * g) );
                  break;

         }

         return f;
 }
 

 Calculate.cpp


 /*
 * Author: Dodo(rabbit.white at daum dot net)
 * Created by: 2018-07-15
 * Project Name: E,G,v의 관계식(탄성계수)
 * FileName: main.cpp
 * Description:
 */


 #include <iostream>
 #include <math.h>
 #include "Calculate.h"


 using namespace std;


 const int GB = pow(10, 9);
 const int MB = pow(10, 6);


 int main(){

        Calculate* cal = new Calculate();

        double e = 200 * (double)GB;
        double v = 0.3;


        cout.setf(ios::fixed);

        cout.precision(3);

        cout << e << endl;


        double result = cal->getG(e, v, cal->getG_TYPE_EV() );
        cout.precision(5);

        cout << result << endl;

        return 0;
 } 

 main.cpp


그림1-1) 출력값


[소스코드]


egk.7z


2. 참고하면 도움되는 자료


1. 영률(Young's), Wikipedia(한글), https://ko.wikipedia.org/wiki/영률

2. 탄성계수(Modulus of elasticity), Wikipedia(한글), https://ko.wikipedia.org/wiki/탄성 계수

3. 전단탄성계수(Shear modulus of elasticity), Wikipedia(한글), https://ko.wikipedia.org/wiki/전단탄성계수

4. 전단탄성계수(Shear modulus of elasticity), Wikipedia(영문) https://en.wikipedia.org/wiki/Elastic_modulus

반응형
728x90
300x250

[CAD(2D)] 도면 구성하기 - AutoCAD


도면을 실질적으로 KS규격에 맞게 구성하는 방법을 소개한다.

이번 주제에서 다룰 명령어는 line, rectangle, offset 3가지이다.


소프트웨어
- CAD-SW: AutoCAD 2016
- OS: Microsoft Windows 7


1. 도면 구성요소


두 가지만 표시했는데, 윤곽선하고 중심마크를 표시했다.

실제로는 윤곽선, 중심마크, 표제란 정도는 필수적으로 있어야 한다.


자세한 내용은 standard.go.kr(표준 관련)에서 찾아볼 수 있다.


2. 실무적인 도면 작성


2-1) 하단의 표제란


  설정 대상

바꿔야할 선(색상)

비고 

 중심마크(센터마크)

 외형선(초록색)


 윤곽선

 윤곽선(하늘색)


 표제란(색상별로 소개)

빨강색-> 가는실선(빨강색) 


 노란색->문자(노란색)

문자열 크기: 3.15 

초록색->외형선(초록색) 


2-2) 상단의 표제란


 설정 대상

바꿔야할 선(색상)

비고 

상단 표제란 

빨강색->가는실선 


 노란색->문자

크기: 3.15 


3. 도면 작성하기


1. rectangle 실습하기


 명령어:

 rec

 0,0                          / 시작점

 420, 297 (입력 예: 용지 크기, 임의의 숫자) / 종료점 


2. offset 실습하기


 명령어: of

 10

 엔터

 대상 선택

 클릭 


3. line 실습


가는 실선으로 설정 후에 작업함.


 명령어: l

 마우스 방향 (위치 알아서) 100

 명령어: l

 마우스 방향 (위치 알아서) 10


4. 완성해보기


3. 참고하면 도움되는 것


[CAD] 도면 셋팅에 있어서 가장 중요한 점, http://yyman.tistory.com/1020, 2018-07-15


4. 양식


 파일 첨부

 비고

 template.dwg

 용지크기: 420 x 297로 작업함.

다른 용지 사용할 경우, 변경 필요함.


반응형
728x90
300x250

[CAD(2D)] 도면 셋팅에 있어서 가장 중요한 점 - AutoCAD


범용 캐드는 말 그대로 범용적으로 사용되는 캐드이다.

지금 소개하는 오토캐드 또한 범용캐드이다.

전문적으로 사용되는 캐드에는 "OrCAD(전기/전자 분야)" 등 회로 스캐치만 다루는 캐드가 있을 수가 있다.

또 자전거를 설계하기 위해서는 "자전거 특화 캐드"가 있다.


소프트웨어
- CAD-SW: AutoCAD 2016
- OS: Microsoft Windows 7


1. 캐드 도면 설정하기


먼저 간단한 작업환경에 대해서 소개하겠다.


적어도 이 정도의 사항에 대해서는 알고 있으면 좋다.

모르면 참고자료를 참고해도 무방하다.


2. 실질적인 도면 환경설정


2.1 용지 설정하기


실질적인 도면 환경설정은 크게 어렵진 않다.

도면 크기를 먼저 결정하는 것이다.


재료의 크기를 결정해야 하는 것처럼 도면도 도면 크기를 결정해야 한다.


limits

-> 0, 0            // 시작점 

-> 594, 420      // 종료점


이러한 간단한 명령을 통해서 용지 크기를 결정할 수 있다.


2.2 레이어 설정하기


도면을 작성하는 데 있어서 각각의 표시해놓는 것이 좋다.

이유는 점선을 작업하는지, 숨은 선(Hidden Line)을 작업하는 것인지 식별이 되지 않을 때가 있기 때문이다.


그림2-2-1) Layer 명령어 입력 (오토캐드 2015)


Layer를 키면, 아래와 같은 창이 뜬다.


그림2-2-2) 오토캐드 2015에서의 도면층(Layer)


그림2-2-3) 오토캐드 2014(2010)에서의 도면층(Layer)


두 개의 환경설정은 큰 차이를 갖지 않는다.


그림 2-2-4) 레이어 설정 예


도면층을 위의 그림처럼 환경설정을 해준다.

이와 관련된 사항은 KS규격이나 혹은 작업장에서 (처음) 설계자가 지시한 사항대로 작성하면 된다.


  번호

 이름

 색상

 가중치

 1

 숨은선(Hidden),
외형선(Continous)

 노란색

0.35 mm, 0.50mm

 2

 윤곽선(Continous)

 하늘색

0.70 mm

 3

 가는실선(Continous),
가상선(Phantom),

중심선(Center),
치수선(Continous)

 빨간색

0.25 mm

 4

 문자

 노란색

0.35 mm


2.3 문자열 설정하기


문자열 설정하기는 무척 중요하다. 글자의 크기를 결정하는 중요한 요인이 된다.

이러한 환경설정을 안 해놓고 진행해도 물론 상관은 없다.


다만, 나중에 글자 크기 등을 조정할 때 dimscale 등의 명령어 또는 마우스 클릭 등으로 환경설정 작업 등을 많이 해야 한다.

매우 낭비적이고 소모적인 시간이 발생하기 때문이다.


그림2-3-1) 문자 스타일 (Layer) / 오토캐드 (2014)


문자 스타일을 바꿀 수가 있다.


그림2-3-2) 문자스타일 설정 / 오토캐드 2015


예를 하나 들겠다.


 스타일 명 

 요구 사항

 isocp

 isocp.shx로 환경설정할 것 / 큰 글꼴 (체크 해제)

 굴림

 굴림체로 할 것 / 글꼴스타일: 보통


그림 2-3-3) 문자스타일 작성 예


그림 2-3-4) 문자 스타일 설정 완료


그림 2-3-4처럼 문자 스타일을 설정했다면 잘 한 것이다.


2.4 치수 스타일 설정하기


치수 스타일을 설정하는 방법에 대해서 소개하도록 하겠다.

명령어는 dimstyle이다.


명령어 

 dimstyle


그림 2-4-1) 치수 스타일 관리자


 치수 스타일명 

 {자기 이름}


이 정도만 간단하게 입력하고 나머지는 어떠한 설정만 하면 되는지 소개하도록 하겠다.


확인을 누른다.


2. 맺는글


도면 셋팅에 있어서 가장 중요하다고 생각되는 부분이다.

반응형
728x90
300x250
[Mechanics] 역학을 공부하면서


역학이라는 게 정말 중요하다고 주장한다.

기계 가공을 하는데 있어서도 재료를 결정할 수가 있다.


재료역학에서 가장 중요한 식은 응력에 관한 식이다.


1. 재료역학에서 중요한 식


 수직응력(Normal Stress)

전단응력(Shearing Stress)


수직응력과 전단응력에 관한 식이다. 식으로는 큰 차이를 느끼진 못 한다.

그래서 몇 가지 간단한 시뮬레이션을 주제를 잡고 진행하게 되었다.


다음은 안전계수(factor of safety ; S)에 관한 식이다.


 안전계수(factor of safety ; S)


안전계수를 정하는 것은 정말 중요한 일이다.

말 그대로 재료를 사용하는데 있어서 파괴 등이 일어나지 않고, 적정한 범위를 유지하려면 중요한 식이다.


아래의 코드는 하드코딩(Hard-Coding)으로 작성한 자바 프로그램 코드이다.


 /*
 * Created: 2018-05-29
 * Subject: Calculate.java
 * Author: Dodo
 */

 public class Calculate {
 
      private final double PI = 3.14159265359;
 
      public Calculate() {
 
      }
 
      public double generalArea(double dimension) {
             return ( PI / 4 ) * (dimension * dimension);
      }
 
      public Stress getStress(Stress value) {
   
             double weight = value.getWeight();
             double area = value.getArea();
             double stress = weight / area;
  
             value.setStress(stress);
             return value;
     }

     public double getSafety(Stress allow, Stress yield) {
  
             double safety = allow.getStress() / yield.getStress();
             return safety;
     }

}

 Calculate.java


 /*
  * Created: 2018-05-29
  * Subject: Stress.java
  * Author: Dodo
*/

public class Stress {
 
       private double stress;
       private double weight;
       private double area;


       public Stress() {
            this.stress = 0;
            this.weight = 0;
            this.area = 0;
       }
 
       public Stress(double stress, double weight, double area) {
            this.stress = stress;
            this.weight = weight;
            this.area = area;
       }


       public double getStress() {
            return stress;
       }
 
       public void setStress(double stress) {
            this.stress = stress;
       }
 
       public double getWeight() {
            return weight;
       }
 
       public void setWeight(double weight) {
            this.weight = weight;
       }
 
       public double getArea() {
            return area;
       }
 
       public void setArea(double area) {
            this.area = area;
       }
  
 } 

 Stress.java


 /*
 * Created: 2018-05-29
 * Subject: Program.java
 * Author: Dodo
*/


 import java.io.File;
 import java.io.FileWriter;

 public class Program {
 
       private static final int MAX = 10000;
 
       public static void main(String[] args) {
              experiment();
       }
 
       public static void experiment() {
   
              String txt = "테스트입니다!!" ;
              String fileName = "test11.txt" ;      
       
              int retval1 = -1;
              int retval2 = -1;


              try{
                   // 파일 객체 생성
                   File file = new File(fileName) ;

                   // true 지정시 파일의 기존 내용에 이어서 작성
                   FileWriter fw = new FileWriter(file, true) ;

                   // 계산
                   Calculate calculate = new Calculate();

                   int count = 1;
      
                   double weight = 10;
                   double area = 0;  
                   double dimension = 0;
       
                   double resultStress = 0;
                   double targetMin = 8.1;
                   double targetMax = 9.4;


                   String strTxt ;
      
                   strTxt = "count,weight,dimension,area,stress,result";
                   // 파일안에 문자열 쓰기

                   fw.write(strTxt);
                   fw.write("\r\n");
                   fw.flush();
      
                   for ( int i = 0; i < MAX; i++ ) {
       
                      weight = i;
       
                      for ( int j = 0; j < MAX; j++ ) {
        
                           dimension = j;
                           area = calculate.generalArea(dimension);
        
                           resultStress = weight / area;
         
                           strTxt = count + "," + weight + "," + dimension + "," + area + "," + resultStress + " ,실험";
                
                           retval1 = Double.compare (resultStress, targetMin);
                           retval2 = Double.compare(resultStress, targetMax);
        
                           if ( retval1 > 0 && retval2 < 0 ) {
                                  strTxt = count + "," + weight + "," + dimension + "," + area + "," + resultStress + " ,참";
                           } // end of if
        
                           // 파일안에 문자열 쓰기
                          fw.write(strTxt);
                          fw.write("\r\n");
                          fw.flush();
        
                          count++;
         
                   } // end of for
      
               } // end of for

               // 객체 닫기
               fw.close();

        }catch(Exception e){
               e.printStackTrace();
        } // try~catch
       
    }
 
}

 Program.java


내가 찾고자 하는 것은 다른 것이 아니었다.


double weight = 10;
double area = 0;  

double dimension = 0;
       
double resultStress = 0;
double targetMin = 8.1; // (MPa)
double targetMax = 9.4; // (MPa)


주어진 응력(Sigma_{Min})은 8.1MPa, 응력(Sigma_{Max})은 9.4MPa이다.

이 범위에 부합하는 임의의 W, A, D을 결정할 수 있는 수치의 값이 어떠한지를 나는 찾고 싶었다.


이러한 주제이다.

사람이 풀라고 하면 못 푸는 문제이다.


맺음) 역학은 물체에 힘이 작용할 때 현상을 공부하는 것이다.


이러한 기본적인 식 이외에도 무수히 식이 많다.

다 외우는 건 한계가 있으며, 역학을 재미있게 공부하는 것은 현상을 이해하는 것이 중요하다고 본다.

반응형

+ Recent posts